When applying for official documents such as passports, visas, or other identification, having a correctly sized passport photo is crucial. Many applications are rejected simply because the photo does not meet the required dimensions or specifications. Knowing how to properly resize a passport photo ensures your application is processed smoothly and prevents unnecessary delays resize passport photo.
Understanding Passport Photo Requirements
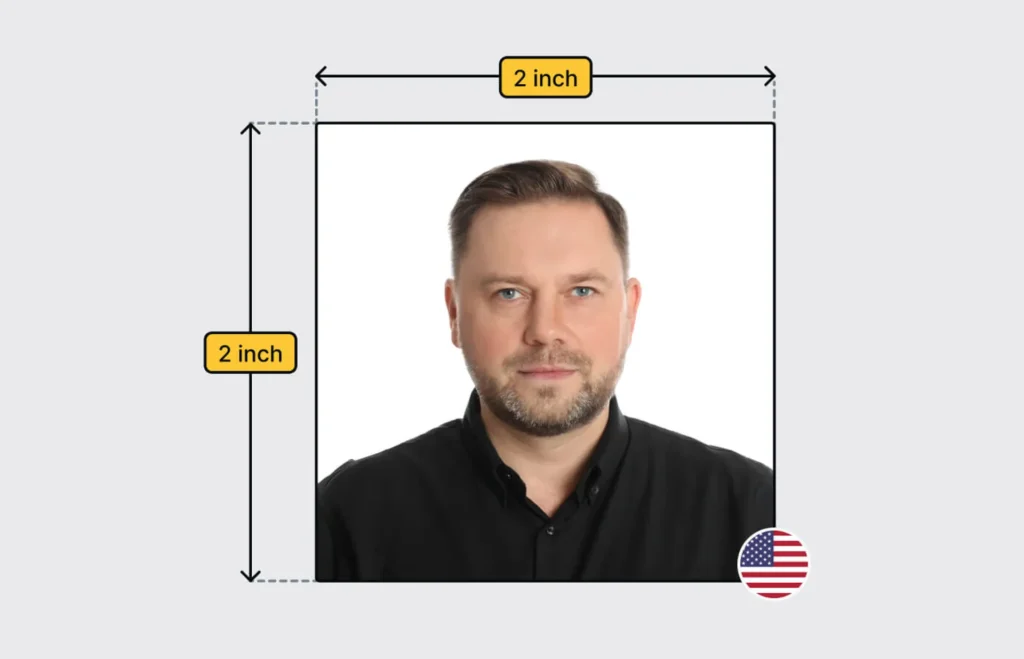
Before resizing a passport photo, it is essential to understand the requirements set by the issuing authority. Most countries have strict guidelines regarding photo dimensions, background color, facial expression, and other elements. For example, in the United States, a passport photo must be 2 x 2 inches (51 x 51 mm), whereas other countries may have slightly different standards. Failing to comply with these requirements can result in your application being rejected.
The key specifications often include:
- Exact dimensions in width and height
- Correct head size and positioning
- Uniform, light-colored background
- Neutral facial expression with eyes open
Knowing these requirements in advance will guide you when you attempt to resize passport photo images.
Choosing the Right Software for Resizing
Several tools and software programs allow you to resize passport photos accurately. You can use professional software like Adobe Photoshop or GIMP, which provide precise control over dimensions, resolution, and image quality. For users who prefer simplicity, there are online tools specifically designed for resizing passport photos to meet government standards.
When selecting software, consider:
- The ability to set exact dimensions
- Resolution adjustment options
- Preservation of image quality
- Ease of use
Using the right tool ensures that your photo meets the official specifications without distortion or pixelation.
Preparing the Original Photo
Before resizing, ensure the original photo meets basic quality standards. A blurry, overexposed, or poorly lit photo will not improve when resized. It is recommended to start with a high-resolution image that clearly shows your face against a plain background.
Steps to prepare the original photo:
- Choose a recent photo taken within the last six months
- Ensure even lighting to avoid shadows on the face or background
- Remove any accessories such as hats or sunglasses unless medically necessary
- Align the face properly in the center of the frame
Preparing the image carefully will make the resizing process more effective and reduce the chance of rejection.
Step-by-Step Guide to Resize Passport Photo
Resizing a passport photo requires attention to both dimensions and resolution. Follow these steps to resize passport photo accurately:
- Open the Image in Editing Software: Load your photo into a program that allows precise dimension adjustments.
- Set the Dimensions: Specify the width and height according to the official requirements. For instance, if the standard is 2 x 2 inches, set the image size accordingly.
- Adjust Resolution: Most passport photo guidelines recommend a resolution of 300 DPI (dots per inch). This ensures that the image is sharp and clear when printed.
- Crop the Image: Ensure the face occupies the recommended portion of the photo. Typically, the head height should cover 50–70% of the photo.
- Check Alignment: The eyes should be level and in the middle section of the photo, and the face should be centered.
- Save the Image in the Correct Format: Most applications require JPEG format with minimal compression to maintain quality.
By carefully following each step, you can resize passport photo images without losing quality or violating official standards.
Common Mistakes to Avoid
Even with careful editing, applicants often make mistakes when resizing passport photos. Being aware of these pitfalls can save time and prevent application delays:
- Incorrect Dimensions: Always double-check the exact size requirement; even small deviations can result in rejection.
- Poor Resolution: Resizing low-quality images can cause blurring and pixelation.
- Distorted Faces: Avoid stretching the image disproportionately, which can alter facial features.
- Ignoring Background Requirements: The background color and uniformity are just as important as size.
- Over-Cropping: Cropping too tightly can cut off essential parts of the head or shoulders.
Avoiding these mistakes ensures your resized passport photo meets all application standards.
Using Online Tools to Resize Passport Photos
For convenience, there are many online tools that allow you to resize passport photos quickly. These tools often have pre-set dimensions for different countries and automatically adjust the image to comply with official guidelines.
Advantages of online tools include:
- Quick resizing without complex software
- Automatic adjustment to meet government standards
- Preview options before downloading
- Compatibility with mobile devices
While online tools are useful, always ensure that the final image maintains high resolution and clarity, especially if it will be printed.
Printing the Resized Passport Photo
Once you have resized your photo digitally, the next step is printing. Printing requires careful attention to quality and paper type. Use photo paper with high resolution to avoid fading or blurring. Most passport photos are printed on glossy or matte photo paper, depending on the guidelines.
Tips for printing:
- Use a high-quality printer capable of 300 DPI output
- Avoid resizing further during printing; use the exact dimensions already set
- Print multiple copies to have backups in case of errors
Proper printing ensures your resized passport photo remains acceptable for submission.
Digital Submission Considerations
Some applications now allow digital submissions of passport photos. When submitting digitally, ensure that your resized passport photo meets file size and format requirements. Common formats include JPEG or PNG, and maximum file size restrictions may apply.
Check the following before uploading:
- Correct file dimensions
- Adequate resolution (usually 300 DPI or 600 x 600 pixels minimum)
- Accurate color representation
- Proper background and lighting
Adhering to digital requirements is just as important as physical dimensions for printed photos.
Final Tips for Successful Passport Photo Resizing
To summarize, resizing a passport photo requires precision, attention to guidelines, and careful preparation. Key tips include:
- Always start with a high-resolution image
- Use reliable software or online tools for resizing
- Maintain correct dimensions, resolution, and alignment
- Avoid common mistakes like distortion or incorrect cropping
- Ensure proper printing or digital submission format
By following these steps, you can confidently resize passport photo images that meet all official requirements and ensure your application is processed without issues.
Proper resizing of a passport photo may seem like a small detail, but it is critical for successful applications. Taking the time to resize passport photo correctly can save time, money, and frustration while ensuring that your identification documents are accepted without delays.